Jump to:
 Voorbereiden
 Opstarten
 Domoticz
 Relais schakelen
 Bewegingsmelder
 Watermeter
 RF433 transmitter
 Internet uptime
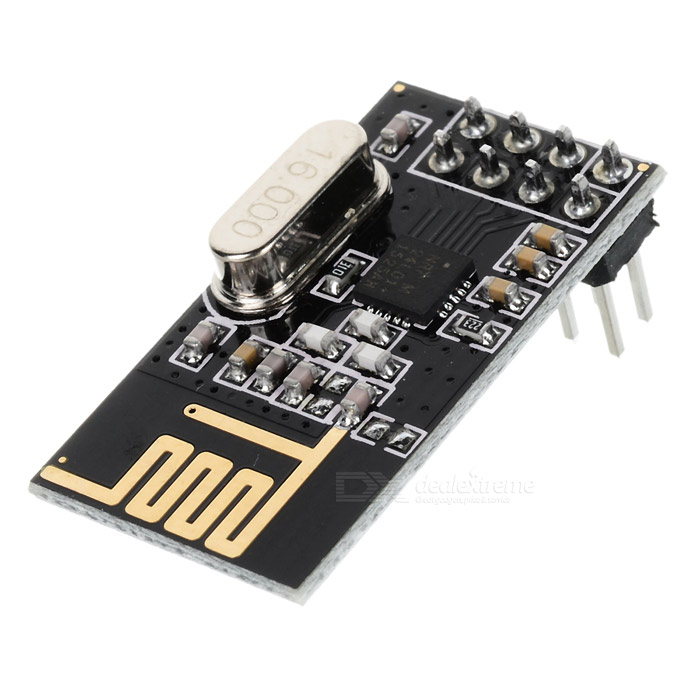 MySensors
Download alle onderstaande Scripts hier
Download alle onderstaande Scripts hier

Voorbereiden:
- Download Raspbian JESSIE LITE image voor RPi op https://www.raspberrypi.org/downloads/
- Uitpakken met bijv 7zip
- Op SDCard zetten met bijv Win32Diskimager
- SSH aanzetten door een leeg bestandje aan te maken: ssh
- WLAN aanzetten door bestandje te maken: wpa_supplicant.conf
network={
    ssid="YOUR_SSID"
    psk="YOUR_PASSWORD"
    key_mgmt=WPA-PSK
}

Opstarten
- opstarten RPi met SDCard erin
- inloggen met bijv putty
- sudo raspi-config
- TimeZone instellen - Europe --> Amsterdam
- Filesystem uitbreiden - Advanced --> Expand Filesystem --> Save --> reboot
- wachtwoord wijzigen: passwd
- wachtwoord root wijzigen: sudo passwd root
- installeer eventueel apache: sudo apt-get install apache2 -y

Domoticz
- installeer domoticz:
sudo apt-get update
sudo apt-get upgrade
sudo curl -L -k install.domoticz.com | sudo bash

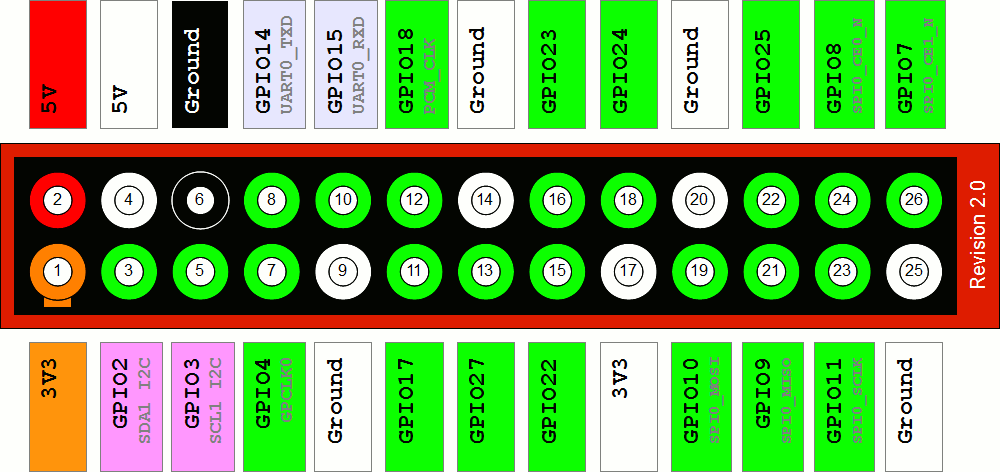
BCM GPIO pin layout
- Het aansluiten van sensors op de Raspberry Pi gaat via de GPIO.
In de python code wordt meestal gesproken over BCM GPIO. In dit plaatje staan de BCM GPIO codering: - Of dit plaatje komt ook veel voor op het internet:


Relais schakelen
- Sluit relais aan op pin 18 is gelijk aan BCM GPIO pin 24
- Maak een Dummy hardware aan binnen Domoticz
- Maak een Virtuele sensor aan RelaisSchakelaar en type schakelaar
- Maak een script aan /home/pi/domoticz/scripts/lua/script_device_RelaisSchakelaar.lua
-- script name : script_device_RelaisSchakelaar.lua
-- This script will trigger a bash script every time the device "RelaisSchakelaar" change status

local sensor = 'RelaisSchakelaar'

commandArray = {}

if (devicechanged[sensor] == 'On') then
os.execute ("python /home/pi/relais/relais-stand-1.py")
end

if (devicechanged[sensor] == 'Off') then
os.execute ("python /home/pi/relais/relais-stand-0.py")
end

return commandArray
from time import sleep

# get the GPIO Library
import RPi.GPIO as GPIO

#BCM GPIO input pin 24 (aangesloten op header18)
GPIO.setmode(GPIO.BCM)
GPIO.setup(24, GPIO.OUT)

#uit
GPIO.output(24, 0)
from time import sleep

# get the GPIO Library
import RPi.GPIO as GPIO

#BCM GPIO input pin 24 (aangesloten op header18)
GPIO.setmode(GPIO.BCM)
GPIO.setup(24, GPIO.OUT)

#aan
GPIO.output(24, 1)

Bewegingsmelder
- Sluit de PIR sensor aan op pin 15 is gelijk aan BCM GPIO pin 22
- Maak een Virtuele sensor aan PIRSensor en type Motion Sensor en maak gebruik van de uitschakelvertraging. Het onderstaande script stuurt alleen de ON commando's. De uitschakelvertraging zet de PIRSensor status weer op uit.
- Maak een script aan /home/pi/pirsensor/pirsensor-edge.py

import RPi.GPIO as GPIO
import datetime
import time
import os
GPIO.setmode(GPIO.BCM) # set up BCM GPIO numbering
GPIO.setwarnings(False)
GPIO.setup(22, GPIO.IN) # Read output from PIR motion sensor
# Define a threaded callback function to run in another thread when events are detected
def my_callback(channel):
if GPIO.input(22): # if port 22 == 1
os.system('curl -s "http://127.0.0.1:8080/json.htm?type=command¶m=switchlight&idx=18&switchcmd=On" > /dev/null')
else: # if port 22 != 1
#os.system('curl -s "http://127.0.0.1:8080/json.htm?type=command¶m=switchlight&idx=18&switchcmd=Off" > /dev/null')
# when a changing edge is detected on port 22, regardless of whatever
# else is happening in the program, the function my_callback will be run
GPIO.add_event_detect(22, GPIO.BOTH, callback=my_callback)
while True:
time.sleep(2)
@reboot python /home/pi/pirsensor/pirsensor-edge.py > /dev/null 2>&1


Watermeter
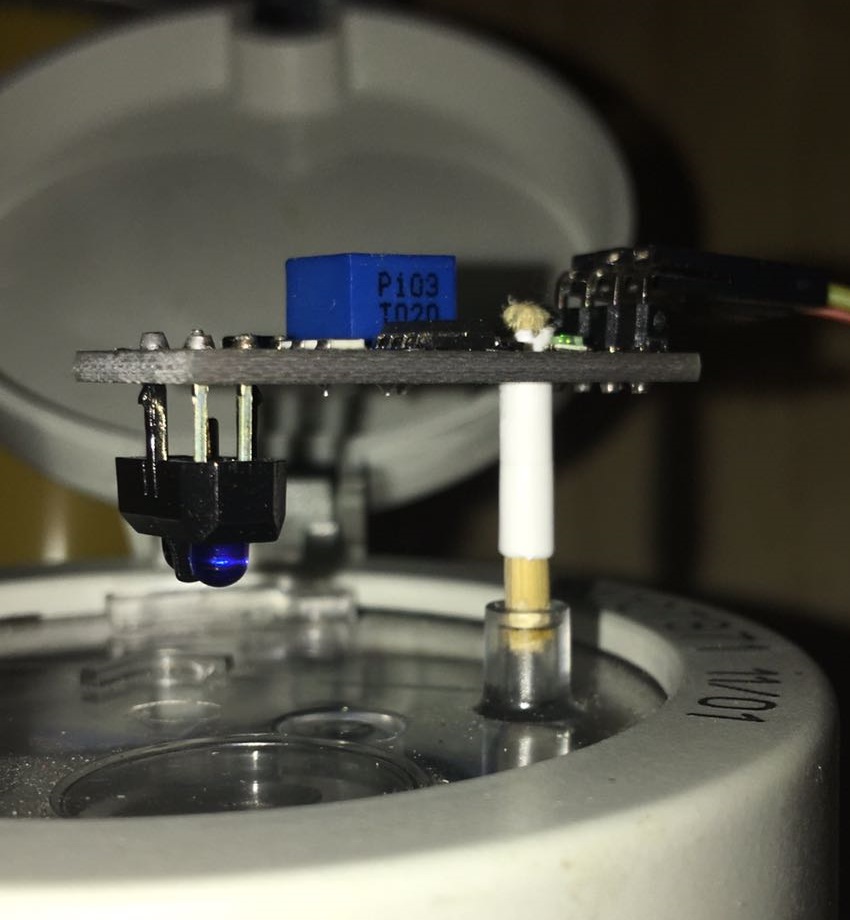
- Het waterverbruik bijhouden met een infrarood lijnzoeker.
Plaats de infrarood sensor vlak boven de watermeter zodanig dat de sensor het "maantje" kan volgen. - De IR-sensor voeden met 5V en aansluiten op pin 13 is gelijk aan BCM GPIO pin 27
- Maak een Virtuele sensor aan Watermeter van sensortype Teller (incrementele). Pas daarna het type aan naar Water
- Omdat het een incrementele teller is, update het onderstaande script de watermeter met de waarde 1. Domoticz telt zelf op.
Maak een script aan /home/pi/watermeter/watermeter.py



import RPi.GPIO as GPIO
import datetime
import time
import logging
import os
GPIO.setmode(GPIO.BCM) # set up BCM GPIO numbering
GPIO.setwarnings(False)
GPIO.setup(27, GPIO.IN) # Read output from IR sensor
sensorstate = 0
# Define a threaded callback function to run in another thread when events are detected
def my_callback(channel):
global sensorstate
if GPIO.input(27): # if port 27 == 1
#ts = datetime.datetime.now()
#print ts," Sensor detected on 27, sensorstate:", sensorstate
if sensorstate == 1:
sensorstate = 0
else:
sensorstate = 1
# Update domoticz with new counter
os.system('curl -s "http://127.0.0.1:8080/json.htm?type=command¶m=udevice&idx=19&svalue=1" > /dev/null')
# when a changing edge is detected on port 25, regardless of whatever
# else is happening in the program, the function my_callback will be run
GPIO.add_event_detect(27, GPIO.BOTH, callback=my_callback, bouncetime=200)
while True:
time.sleep(2)
@reboot python /home/pi/watermeter/watermeter.py > /dev/null 2>&1

RF433 transmitter
- Sluit de RF433 transmitter aan op: pin 8 is gelijk aan WiringPi pin 15 is gelijk aan BCM GPIO pin 14
- Maak een Dummy hardware aan binnen Domoticz
- Maak een Virtuele sensor aan StopContact2 en type schakelaar
- Installeer WiringPi:
cd /home/pi
git clone git://git.drogon.net/wiringPi
cd wiringPi
git pull origin
./build
cd /home/pi
wget -O lights.zip http://www.mannema.nl/lights.zip
unzip lights.zip
cd lights
g++ -o kaku kaku.cpp -I/usr/local/include -L/usr/local/lib -lwiringPi
Start onderstaande test tijdens het "leren" en de kaku stopcontact is nu gekoppeld.
sudo ./kaku 19 D on
-- script name : script_device_StopContact2.lua
-- This script will trigger a bash script every time the device "StopContact2" change status

local sensor = 'StopContact2'

commandArray = {}

if (devicechanged[sensor] == 'On') then
os.execute ("/home/pi/lights/kaku D 19 on")
end

if (devicechanged[sensor] == 'Off') then
os.execute ("/home/pi/lights/kaku D 19 off")
end

return commandArray

Internet Uptime
- Maak een virtuele Percentage device aan binnen Domoticz
- Monitoren van de internet uptime kan eenvoudig met het volgende script
Opslaan als /usr/local/bin/loginternet.sh
#!/bin/sh pi=$(ping -c 5 8.8.8.8 -i 0.5 | grep received | cut -f2 -d"," | cut -f2 -d" ") case $pi in 5) curl -s "http://127.0.0.1:8080/json.htm?type=command¶m=udevice&idx=23&nvalue=0&svalue=100" ;; 4) curl -s "http://127.0.0.1:8080/json.htm?type=command¶m=udevice&idx=23&nvalue=0&svalue=80" ;; 3) curl -s "http://127.0.0.1:8080/json.htm?type=command¶m=udevice&idx=23&nvalue=0&svalue=60" ;; 2) curl -s "http://127.0.0.1:8080/json.htm?type=command¶m=udevice&idx=23&nvalue=0&svalue=40" ;; 1) curl -s "http://127.0.0.1:8080/json.htm?type=command¶m=udevice&idx=23&nvalue=0&svalue=20" ;; *) curl -s "http://127.0.0.1:8080/json.htm?type=command¶m=udevice&idx=23&nvalue=0&svalue=0" ;; esac
* * * * * /usr/local/bin/loginternet.sh > /dev/null 2>&1

NRF24L01 (MySensors Gateway)
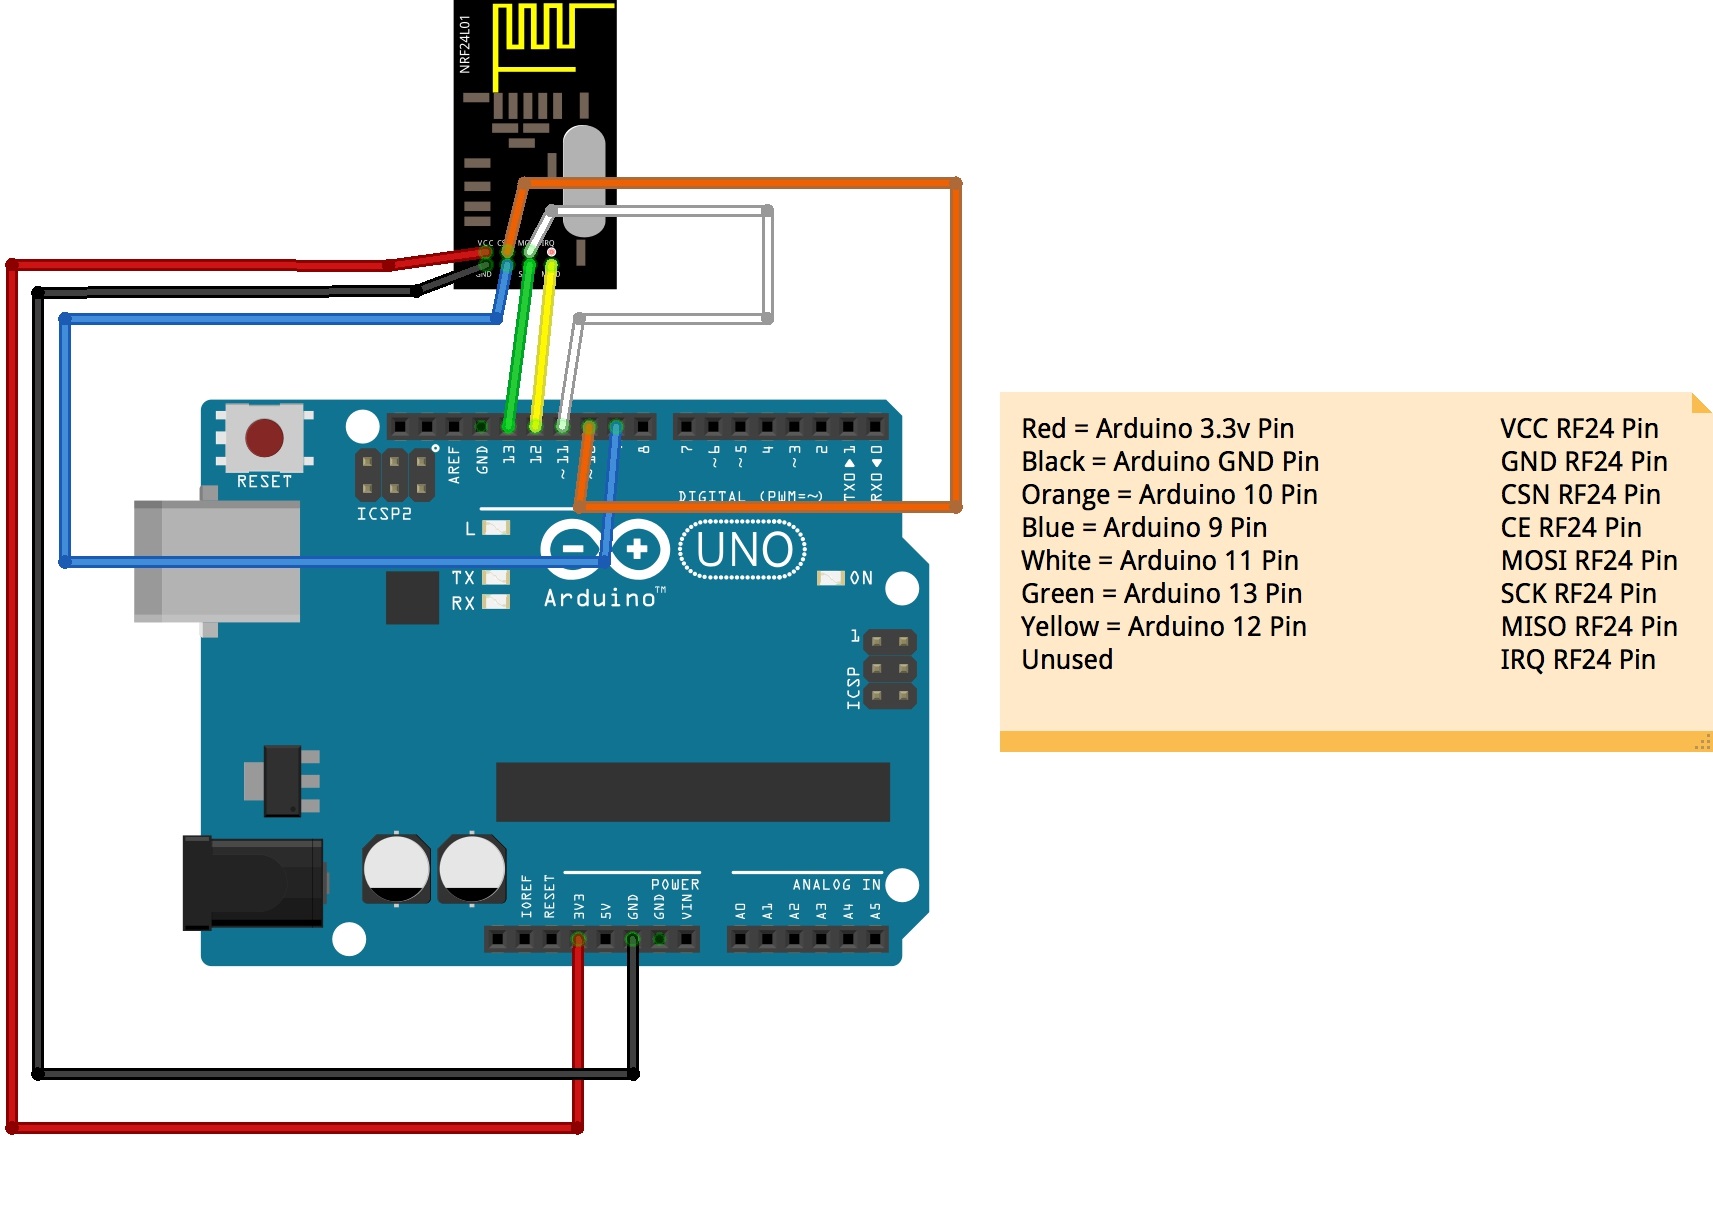
- Voor de MySensors Gateway is een Arduino en een NRF24L01 nodig. De Arduino voorzien van deze sketch GatewaySerial code
Binnen Arduino is de Sketch programma ook te vinden onder de File, Examples, MySensors, GatewaySerial. Of bekijk de mysensors.org website - NRF24L01 aansluiten ( Klik om te vergroten )
- Arduino aansluiten via USB aan de Raspberry PI
- Voeg nieuwe hardware toe binnen Domoticz van het type MySensors Gateway USB
- Vanaf nu kunnen de MySensors Nodes zich melden bij de MySensors Gateway die het weer doorgeeft aan Domoticz

NRF24L01 (MySensors Node)
- In mijn voorbeeld gebruik ik een PIR sensor en een DHT11 (temperatuur en luchtvochtigheid sensor)
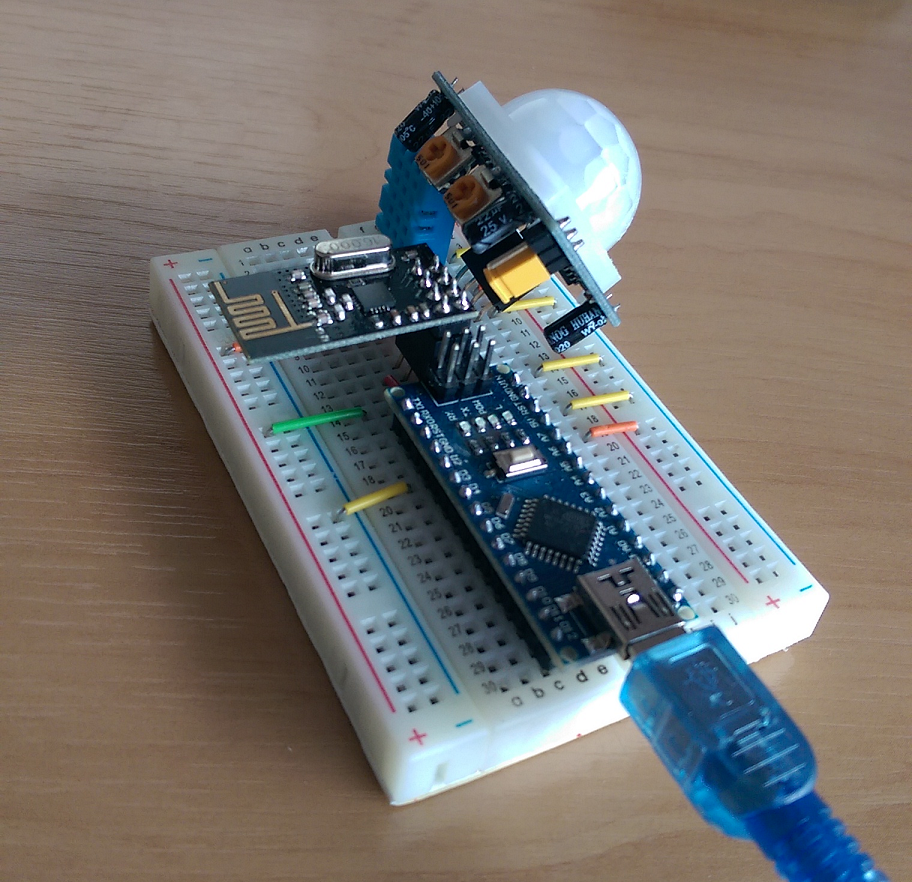
- Aansluitingen, foto's en de sketch code is binnen deze website te vinden op de mySensors pagina